Additional Installation Steps
Restart SharePoint TimerJob Service and IIS
MatchPoint's timer job engine uses functionality of the SharePoint TimerJob service. Therefore, after the solution files have been deployed, the service has to be restarted:
net stop sptimerv4
net start sptimerv4
This has to be repeated after a MatchPoint update was applied to the system and whenever custom solutions are deployed/upgraded that use the MatchPoint API.
Also, it is recommended to restart the IIS after solutions have been deployed or upgraded on every frontend server:
iisrest
After the MatchPoint managed properties have been created, it is required to restart the IIS.
Create a Tagging Service Application
If you plan on using the tagging functionality of MatchPoint in your SharePoint environment, you have to create a "Tagging Service application". This service application provides access to the tag metadata model.
The Tagging Service application can either be created by using the command New-MPTaggingServiceApplication (see "Administrating MatchPoint Tagging Service Applications" in the "PowerShell CmdLets"-section for detailed description) or by using the Central Administration:
- Navigate to the central administration site of your SharePoint farm.
- Select "Application Management" and "Manage Service Applications".
- Select "New" and "MatchPoint Tagging Service Application".
- Specify the parameters for your service application according to the requirements of your SharePoint environment.
If a timeout exception occurs during the provisioning of a tagging service application
("The timeout period elapsed prior to completion of the operation or the server is not responding.
ALTER DATABASE statement failed"), the following SQL command can be used:
ALTER DATABASE [MatchPointDataBase] SET READ_COMMITTED_SNAPSHOT ON
Afterwards, please repeat the configuration of a tagging service application.
Create Additional Web Application Associations
If your SharePoint farm contains more than one web application and if you plan on using MatchPoint for these additional web applications, you need to add them to your MatchPoint instance.
Naturally, if you use MatchPoint functionality on multiple web applications, you have to ensure that the MatchPoint solutions
are deployed to each of these web applications. You can use both the MatchPoint Installer or the manual installation to do this.
If you are using the Installer, please only select the installation options "Install Tag Inheritance" and 'Install Server Infrastructure'.
Please note that you have to create the instance associations BEFORE deploying the feature "Colygon.MatchPoint.Server.Infrastructure".
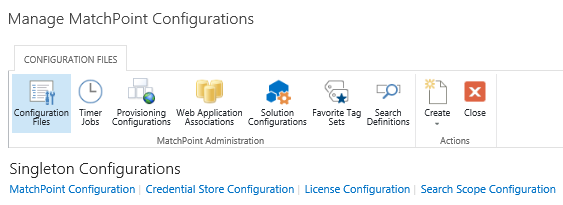
To create a web application association, please open the Manage MatchPoint Configurations form, either from the MatchPoint Instance Administration site or by pressing Ctrl + M on any MatchPoint enabled site. Select the button Web Application Associations:
Here you can select any web application within your farm and create an association to the current MatchPoint instance:
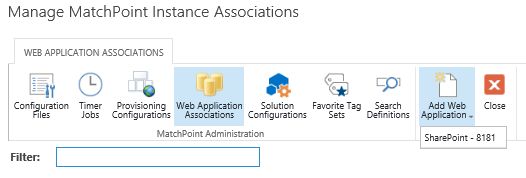
In a SharePoint least privilege environment, the "Add Web Application" button is not available within the SharePoint GUI. Instead you need to create web application associations using a PowerShell CmdLet.
Configure Logging and Exception Handling
SharePoint ULS log
MatchPoint uses the SharePoint ULS logging mechanism. To configure logging, please navigate to your farm's central administration site, select "Monitoring" and "Configure diagnostic logging". Within the "Event Throttling" section you can configure the logging level for the various features of MatchPoint.
It is strongly recommended to select MatchPoint's logging level according to the application scenario. For productive environments it is suggested to use the log level 'Error' to avoid performance impacts.
Create Event Log Source
If you used the MatchPoint installer (automated installation), the event log source "MatchPoint" should already exist and you can skip this chapter.
In order to log to the Windows event log you have to create an event log source called "MatchPoint". A PowerShell Command can be used to create the source. Open the SharePoint Management Shell and enter:
New-EventLog -Source MatchPoint -LogName MatchPoint_Log
The source has to be created on every web front-end and application server of the SharePoint farm.
Error Codes
When an error, warning or info is logged try to identify it using the tables below. If the issue could not be resolved by following the instructions, please contact your MatchPoint solution partner for further assistance.
| Warning # | Description | Instructions |
|---|---|---|
| 1000 | User account resolve failed | Extract the user name that is affected from the log files. Verify if the user is removed or disabled in the AD. Remove disabled or removed users from MatchPoint configuration files and SharePoint security settings such as Site groups. Check if an author of a SharePoint item that does not exist anymore could not be resolved. |
| 1001 | Tagging languages exceeded | Amount of possible tagging languages is limited to 10. Reduce the amount of your tagging languages. |
| 1002 | Update of inherited tags failed | Tags of an item could not be updates. Check if the item still exists and ensure that it is not locked. |
| 1003 | Missing parent tag in tag importer | A configured parent tag in the import configuration is missing. Check the configuration and change the parent tag. Check if a dependent tag import job failed. |
| 1004 | Missing workspace worker job | If the worker job is missing try to disable and re-enable the MP administration feature. This feature ensures the worker job. |
| 1005 | Missing parent term in term importer | Ensure that the specified parent term exists in the term store. Check the configuration and change the parent term. Check if a dependent term import job failed. |
| 1006 | Uninstall of component failed in feature deactivate or uninstall | Ensure that you have farm admin rights and retry to deactivate the feature. |
| 1007 | Assembly is missing | Check if the correct version of the assembly is deployed in the GAC. Maybe a referenced solution is missing. |
| 1008 | Type cache could not be initialized | Ensure that the assembly in in the GAC. |
| 1009 | General timer job exception | Follow the detailed instructions in the error message. |
| 1010 | Configuration failed to load | Ensure that the configuration file still exists. Reassign another configuration to the Web Part if the configuration was deleted or renamed. |
| 1011 | Custom context menu failed to initialize | Check the log for further information. Custom code failed during the initialization of the context menu. |
| Info # | Description | Instructions |
|---|---|---|
| 2000 | Adding Web Part was denied |
A user tried to add a Web Part although uploading custom .DWP files with referenced MP configurations are not allowed. Change LocalWebPartConfigurations setting in the MatchPoint configuration in order to allow adding custom .DWP files. |
| 2001 | Configuration is missing | The configuration manager could not find the specified configuration file, therefore a default configuration is used. |
| 2002 | Tag inheritance job could not find en-queued item | Check if the en-queued item still exists and is not locked. |
| 2003 | Tagging service is installed | The tagging service was successfully installed. |
| 2004 | Tagging service is uninstalled | The tagging service was successfully uninstalled. |
| 2005 | Workspace worker job could not find web | Check if the web is still existing. Probably is was deleted and therefore the worker job cannot find it anymore. |
| 2006 | Tag inheritance failed, the worker job will retry later | This is only for information. A next retry is rescheduled. Ensure that the item exists and is not locked. If the all attempts fail an error 3010 is logged. |
| 2007 | Crawler error |
The crawler failed but you decided to ignore crawl errors. Re-enable the IgnoreCrawlErrors setting, fix the crawl issues or ensure that the index is up to date anyway (because an index that is not current leads to unintendedly deleted tags). |
| Error # | Description | Instructions |
|---|---|---|
| 3000 | Feature deactivation failed | Ensure that you have farm admin rights and retry. |
| 3001 | Tag import failed | Check diagnostics log for more information and correct tag import configuration. |
| 3002 | Term import failed | Check diagnostics log for more information and correct term import configuration. |
| 3003 | Type load failed | Ensure that the assembly containing the type is in the GAC. |
| 3004 | Failure during object dispose | Check diagnostics log for further information. Monitor memory consumption over time. |
| 3005 | Invalid configuration | An invalid, renamed or deleted configuration is referenced in a Web Part or provisioning configuration. |
| 3006 | Retry action failed | Check if the item still exists and is not locked. |
| 3007 | Timer job status / schedule update failed | Ensure that timer job service runs with correct privileges and has permissions on the SP configuration database. |
| 3008 | Tagging service invoke failed | Web service call from web front to tagging service application failed. Check network connectivity and firewall settings. |
| 3009 | Tag inheritance job failed to process work item | Check diagnostics log for further information. Ensure that the item still exists and is not locked. |
| 3010 | Tag inheritance failed | Check diagnostics log for further information. Try to initiate inheritance again by adding / removing tag on container element. |
| 3011 | Tagging service start failed | Ensure that you have farm admin rights when creating a new service instance. |
| 3012 | Tagging service application failed | Call to tagging service application failed. Check diagnostics log for further information. |
| 3013 | Process data item during tag import failed | During the import an item could not be processed. Check the import configuration and resolve issues like wrong expressions and start the import again. |
| 3014 | Workspace event handler failed | Check custom event handler code in your custom solutions. |
| 3015 | Workspace delete tag failed | Check if the tagging service application is available and the workspace tag was not already deleted by another user. |
| 3016 | Workspace delete item failed | Check if the workspace item has not already be deleted by another user and is not locked. |
| 3017 | Workspace rollback failed | The web and list item created during provisioning process that failed could not be rolled back correctly. Delete the web and the list item manually. |
| 3018 | Workspace creation failed | Check diagnostics log for further information. Check target URL expression or other configuration options for errors. |
| 3019 | Workspace archiving failed | Workspace deleted event handler could not archive a workspace. Check diagnostics log for further information. |
| 3020 | Workspace deletion failed | Workspace deleted event handler could not delete a workspace. Check diagnostics log for further information. |
| 3021 | Workspace permissions update failed | Workspace worker job could not update the permissions of a specific workspace item and tag. Check diagnostics log for further information. Ensure that the item is not locked. Try again to update parent workspace permissions and verify if the permissions could be updated on child elements. |
| 3022 | Workspace process work item failed | Check diagnostics log for further information. Ensure correct permissions for timer job service account. |
| 3023 | Tag synchronization update failed | Tag synchronization job could not update tags on specific item. Ensure that the item is not locked or deleted. |
| 3024 | Term deprecation failed | A term that was deleted during imported could not be set to deprecate. |
| 3025 | Feature activation failed | Check diagnostics log for further information and resolution instructions. |
| 3026 | Create instance failed | A registered expression variable, header control, list item event handler, server context menu provider or workspace event handler could not be initialized. Ensure that the constructor is parameter less (except for expression variables) and that no exception is thrown in the constructor. |
| 3027 | Workflow missing parent tag | The specified parent tag in the workflow configuration could not be loaded. Ensure that the tag exists. Correct the workflow configuration. |
| 3028 | Office template failure | The office document could not be generated. Ensure that the template exists and the URL does not exceed 240 characters. |
| 3029 | Workspace list creation failed | The workspace list could not be created. Check diagnostics log for further information and resolution instructions. |
| 3030 | Process data item failed during term import | During the import an item could not be processed. Maybe a term could not be found because another user just deleted it. Check the import configuration and resolve issues like wrong expressions and start the import again. |
| 3031 | Feature installation failed | Check diagnostics log for further information and resolution instructions. |
| 3032 | Feature uninstallation failed | Check diagnostics log for further information and resolution instructions. |
Debugging Settings
MatchPoint implements the following "default" exception handling mechanism:
If an exception occurs within a MatchPoint control (i.e. a Web Part) this control will display only the exception message to the end user. The full stack trace is available within the SharePoint ULS log (if the trace level has been configured accordingly). That way, end users are not confused with detail information in case an exception occurs. For debug scenarios, the stack trace can be enabled for a web application within the web.config file:
<configuration>
  <!-- ... -->
  <appSettings>
    <add key="MatchPoint.ShowCallStack" value="true" />
  </appSettings>
</configuration>
The following setting controls whether the expression text (debug hint) is included in the exception message when the evaluation of an expression fails. When set to true the text of the failing expression is included in the exception message. By default the details of the failing expression is not shown (false).
<configuration>
  <!-- ... -->
  <appSettings>
    <add key="MatchPoint.ShowExpressionDebugHint" value="true" />
  </appSettings>
</configuration>
Configure Self Service Site Creation
If MatchPoint Workspace is used to create sites or site collections, self-service site creation has to be enabled for all web applications that use this functionality:
$webApp = Get-SPWebApplication -Identity <WebAppUrl>
$webApp.SelfServiceSiteCreationEnabled = $True
$webApp.Update()
<WebAppUrl> is the URL of the web application which uses MatchPoint Workspace.
Add MatchPoint Search Content Enrichment Web Service
MatchPoint provides a mechanism to enhance SharePoint Search's support of MatchPoint Tags. The Web Services allows splitting the MatchPointTags managed property to a multi value managed property which results in more accurate/better refiner results. Furthermore, Tag names can optionally be resolved and stored in the index to allow full text search queries against tags. This feature is described in detail in the Tagging chapter in the concepts section.
The MatchPoint Search Content Enrichment Web Service can only be installed when you have a SharePoint Server Enterprise Edition, since Custom Content Enrichment ("Extensible content processing") is a feature of SharePoint Server Enterprise Edition.
To use this feature the following steps are required on your SharePoint environment:
Modify the managed property
MATCHPOINTTAGSby setting "Allow Multiple Values" to true
Add-MPContentEnrichmentManagedProperties -SearchServiceApplication "<NameOfSSA>" -CreateMatchPointTagRefinersOptionally: Create a searchable, multi value managed property called
MATCHPOINTTAGNAMESof type TEXT (note thatMATCHPOINTTAGNAMESis optional here and working only, when it is activated in the web.config by setting ResolveTagNames to true!) AddMATCHPOINTTAGNAMESmanaged property
Add-MPContentEnrichmentManagedProperties -SearchServiceApplication "<NameOfSSA>" -CreateMatchPointTagNames- Deploy the MatchPoint SearchContentEnrichment Web Service to a
WebServer that is part of your SharePoint Farm (the
general deployment of a WCF service is
described here):
- Optionally: Create a new application poolPlease be aware that anonymous access has to be enabled!
- Optionally: Create a new site
- Create a new application in a site of your choice
- Extract the "Colygon.MatchPoint.SearchContentEnrichment.zip" to the directory of the newly created application
- Verify that the service is deployed correctly by accessing:
http://<hostname>:<port>/<applicationAlias>/MatchPointContentEnrichmentService.svcNote that you may need additional (read) permissions to the service with the account you're currently logged in, else you may get an access denied page.If you want to resolve tag names the application pool user requires at least the following permissions/roles:- "SPDataAccess" role on the "SharePont Configuration" database
- "SPDataAccess" role on the "SharePoint Content" database (where the "MatchPoint Instance" site collection is stored)
- "Read Access" on the MatchPoint Tagging Service Application
- Optionally: Create a new application pool
- Adjust the
web.configof the web server according to your needs:<configuration> <!-- ... --> <appSettings> <!-- ... --> <add key="MatchPoint.Instance.URL" value="http://<hostname>/<MPInstance>" /> <add key="ResolveTagNames" value="false" /> <add key="CreateTagRefiners" value="true" /> </appSettings> <!-- ... --> </configuration>MatchPoint.Instance.Url: the Url of the MatchPoint instance (i.e. the result ofMPUtility.GetMatchPointInstanceUrl())ResolveTagNames: whether the web service should resolve tag names to e.g. allow fulltext search for tagsCreateTagRefiners: whether the splitted tags should be written to the MATCHPOINTTAGREFINERS. This is true by default.You might also want to adjust the location of the log file and the log level, according to your needs. Note that the application pool user needs write access to the log file path.
- Register the web service in the SharePoint Search
$config = New-SPEnterpriseSearchContentEnrichmentConfiguration $config.Endpoint = "http://<hostname>/MatchPointContentEnrichmentService.svc" $config.InputProperties = "MATCHPOINTTAGS" # note that the trigger condition is optional here; it is used to avoid unnecessary calls # to the service. In this example the service is called when an item has tags: $config.Trigger = "!(IsNull(MATCHPOINTTAGS))" # note that MATCHPOINTTAGNAMES is optional here and working only, # when it is activated in the web.config by setting ResolveTagNames to true! $config.OutputProperties = "MATCHPOINTTAGREFINERS", "MATCHPOINTTAGNAMES" $config.SendRawData = $false $ssa = Get-SPEnterpriseSearchServiceApplication Set-SPEnterpriseSearchContentEnrichmentConfiguration -SearchApplication $ssa -ContentEnrichmentConfiguration $config - Start a full crawl
SharePoint Search Center with MatchPoint Tags
As of MatchPoint 4.0.10 it is possible to show MatchPoint Tags in the SharePoint Search Center. This includes showing an item's Tags in the HoverPanel as well as a Refiner for Tags. To use this feature, the following prerequisites are necessary:
- MatchPoint version >= 4.0.10
- A site with SharePoint Enterprise or Basic Search Center
- MatchPoint Content Enrichment Web Service
MATCHPOINTTAGREFINERS- (optional)
MATCHPOINTTAGNAMESwith an alias "Tags" and configured as Queryable (to be able to search Tags)
To use this feature, following steps have to be performed:
- Activate "MatchPoint Enterprise Search Center Integration"-feature on the Search Center site (Colygon.MatchPoint.Server.EnterpriseSearchCenter)
- Execute
Add-MPResultTypes -Web <SearchCenterSite>CmdLet to reference MP display templates - Update Result Types on the Search Center site (Site Settings > Manage Result Types)
- Add tag refiner (Edit Page > Refiner Web Part Properties >
Choose Refiners)
- Property:
MATCHPOINTTAGREFINERS - Display Template: MatchPoint Tag Refinement
- Property:
Groups can be configured in the filter template (Display Templates > Filters > edit the options-object in Filter_MPTags.html > Publish).
For more information on Search Center customization please refer to MSDN.
Allow Searching for Tags containing stopwords or noisewords
In case you are using special characters in tag names, tag lookup fields will not behave as expected, i.e. they won't find the tag you are searching for. Since MatchPoint uses SQL fulltext queries to lookup tags, this can be fixed by adjusting or creating a SQL fulltext stoplist and associate it with the "TagName" table. Refer to the MSDN article Configure and Manage Stopwords and Stoplists for Full-Text Search for instructions on how to create and use a stoplist.
Note that after changing a stopwords list, a rebuild of the full text index is required. This is done by right clicking the "TagName" table and choosing "Full-Text index --> Start Full Population / Start Incremental Population".
Execute a Full Crawl on the Search Service Application
Depending on your application scenario and whether you created managed properties during the installation process, it might be required to execute a full crawl on the search service application.
$contentsource = Get-SPEnterpriseSearchServiceApplication | Get-SPEnterpriseSearchCrawlContentSource
$contentsource.StartFullCrawl()
This step should not be required in most environments. However, if you are experiencing problems with search related functionality after adding the managed properties, a full crawl will rebuild the SharePoint search indices and thereby fix the problem.
Install the MatchPoint MUI Package
If you are using MatchPoint in a multi-language SharePoint environment, you need to install the MatchPoint MUI package. It is currently available for the following languages:
- German
- French
- Italian
To install the package using the installer application, ensure that Colygon.MatchPoint.MUI.wsp is located in the installation directory before starting the installed. To install the package manually, please add the Colygon.MatchPoint.MUI.wsp solution file to your solution store and deploy it globally:
Add-SPSolution -LiteralPath C:\Colygon.MatchPoint.MUI.wsp
Install-SPSolution -Identity Colygon.MatchPoint.MUI.wsp
After the solution has been installed, the UI elements of MatchPoint will display any text information that is visible to "end users" either in the language that is configured as the default language of the system or in the language the user has selected as his/her display language.
Activate MatchPoint Features
Depending on your application scenario, you might need to activate different MatchPoint features within your SharePoint farm. The following features (with scope site collection or web) are available after you have completed the installation of MatchPoint:
- Colygon.MatchPoint.Core.WebParts
- Colygon.MatchPoint.WorkflowKit
- Colygon.MatchPoint.Workspace
- Colygon.MatchPoint.Tagging.Infrastructure
- Colygon.MatchPoint.Provisioning.SaveSiteAsTemplate
- Colygon.MatchPoint.Server.PageLayouts
- Colygon.MatchPoint.Server.SendTo
- Colygon.MatchPoint.Server.WebParts
Please refer to Architecture Planning for a description of the functionality of those features.
- The SharePoint GUI: Select "Site Settings" and
- for the "Workspace" feature: "Manage site features"
- for all other features: "Site collection features"
- The "SharePoint 2013 Management Shell":
Enable-SPFeature –Identity <FeatureName> -Url <SiteUrl>The STSADM utility: stsadm –o activatefeature –name <FeatureName> -url <SiteUrl>
Modify the web.config File
If you are using inline code within ASP.Net pages (ASPX) or within custom user controls (ASCX), you have to modify the web.config file of any web applications where you use this functionality:
Using Assemblies
Depending on the usage of standard Microsoft/SharePoint classes within inline code, it might be required to add assemblies to the following configuration section:
/Configuration/system.web/compilation/assemblies
<add assembly="System.Core,
     Version=3.5.0.0, Culture=neutral, PublicKeyToken=B77A5C561934E089" />
The System.Core assembly contains functionality for using Linq extensions. If Linq is used within custom code, the assembly has to be added as shown in the example. Naturally, any other assemblies that are used have to be added as well.
Compilation Settings
For compiling inline code, please specify following settings within the /Configuration/ section:
<compiler language="c#;cs;csharp" extension=".cs"
  type="Microsoft.CSharp.CSharpCodeProvider, System, Version=2.0.0.0, Culture=neutral, PublicKeyToken=b77a5c561934e089"
  warningLevel="4">
  <providerOption name="CompilerVersion" value="v3.5" />
  <providerOption name="WarnAsError" value="false" />
</compiler>