Installation
Once SharePoint, MatchPoint and MatchPoint Snow are configured correctly, the Newsroom Snowflake can be deployed to the environment.
Prerequisites
SharePoint 2016 installed and running
- Includes the creation of a Central Administration – the URL of this site is referred to as <centraladministration> in this document
- Includes the creation of a web application, that will contain the Newsroom Snowflake – the URL of this web application is referred to as <MPSnowWebApplication> in this document
- MatchPoint and MatchPoint Snow installed and configured on the <MPSnowWebApplication> – the URL of the MatchPoint Administration site collection is reffered to as <mpadmin>, and the URL of the MatchPoint Snow site collection is reffered to as <mpsnow> in this document
SharePoint 2016 is installed with the following configured SharePoint Service Applications:
- Search Service Application
- User Profile Service Application
- BDC Service Application
Additional MatchPoint Service Applications:
- MatchPoint Tagging Service Application
The account used for installation should have full control and should be an administrator on the User Profile Service Application
The installation package for the Newsroom Snowflake ready, and unzipped on the server – the root path of the extracted files is referred to as <root> in this document and <drop> makes reference to the folder that contains the installation files (e.g. colygon.newsroom_2016.7.0)
Adapting the deployment package to the target environment
The deployment package can be adapted on the fly to facilitate the deployment in a new environment. This can be done using the configuration files located in \<root>\<drop>.
Server configuration
The server configuration can be configured based on the file server.config.template.xml. Please find below a sample server configuration, with self-explanatory nodes.
<?xml version="1.0" encoding="utf-8" ?>
<Configuration>
    <!-- Specifies the user account used to create the site collections. Double check claim encoding in ADFS environment. -->
    <Owner>some.user@domain.com</Owner>
    <!-- The name of the search service application where the managed properties for MatchPoint and MatchPoint Snow should be created -->
    <SearchServiceApplication>Search Service Application</SearchServiceApplication>
    <!-- Specifies the web application where MatchPoint is installed and the TagStoreId -->
    <MatchPoint WebApplication="http://server.example.com" TagStoreId="xx">
    <!-- Specifies the MatchPoint Administration site with relative url -->
        <AdministrationSite Name="MatchPoint Administration Site" Url="/admin" />
    </MatchPoint>
    <!-- Specifies the web application where MatchPoint snow is installed -->
    <MatchPointSnow WebApplication="http://server.example.com">
    <!-- Specifies the MatchPoint Snow site with relative url -->
        <Site Name="MatchPoint Snow" Url="/snow" />
    </MatchPointSnow>
    <SnowFlake WebApplication="http://server.example.com">
<!--      The definition of the Snowflake site collection. A managed path will be created automatically if required.
        (Optional)
        Use HostHeaderWebApplication="https://hostheader.server.com" to specify a host header web application.
        This is used when creating managed paths and site collections:
        New-SPManagedPath (...) -HostHeader
        New-SPSite -Url (...) -HostHeaderWebApplication "https://hostheader.server.com"        -->
        <Site Name="The Title of the site" Url="/the/snowflake/url" />
      <!-- License Holder and License key are retrieved from Colygon -->
        <License>
          <LicenseHolder>The License Holder</LicenseHolder>
          <LicenseKey>The License key</LicenseKey>
        </License>
    </SnowFlake>
</Configuration>
The TagStoreId can be obtained from Central Administration, Manage service applications (under Application Management), select the corresponding MatchPoint Tagging Service Application for the Web Application where the solution is installed, access “Properties”. The process for obtaining the License Information is described in chapter Requesting a license.
Initial Installation
PowerShell is well-known for its caching behavior. Therefore, it is strongly recommended to run a new instance whenever the point is mentioned in this document, and not to re-use an old one. The previous shell window can be closed.
The installation script is based on xml configuration files. These files can be found in the same location as the installation script: <root>\<drop>\solution.config.xml and <root>\<drop>\<server.config.xml>.
Changes to the file solution.config.xml are not supported, but the file <server.config> should be adapted according to the target environment. This file contains environment-specific information, such as the url to the target web application, the location of the MatchPoint Administration site collection, the name of the Search Service Application etc.
For more details, please refer to the template server configuration file from the installation package.
Installation steps
- (optional) Request a license. Follow the steps from chapter Requesting a license.
- Run a “SharePoint 2016 Management Shell” instance as administrator
- Use one of the following methods:
- Execute the following command:
<root>\<drop>\install.ps1
Provide the parameters that are required as input
WebApplication, SearchServiceApplication, Owner, AdminSiteRelativeUrl, SnowSiteRelativeUrl, SnowflakeSiteRelativeUrl, TagStoreId, LicenseHolder, LicenseKey
During the execution of this script a new server.config.xml file will be generated based on the input parameters.
- Use a config file. The build provides a template “server.config.template.xml”. Update all environment specific variables (Also check Server configuration chapter).
The file can then be used as a parameter in the following Install command
<root>\<drop>\install.ps1 –ServerConfigPath {server.config.xml file path)
This script will install and configure the Newsroom Snowflake on the <MPSnowWebApplication>.
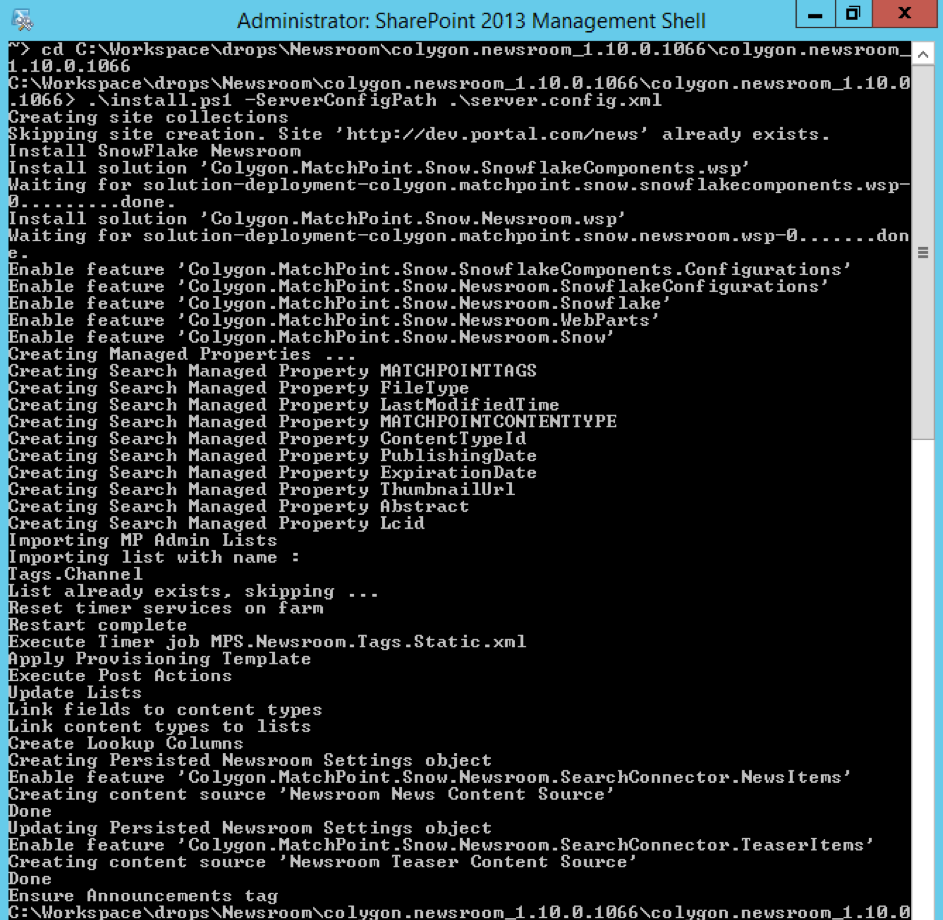 Figure 1 - Successful installation of Newsroom
Detailed description of installation operations run by the script
For a detailed overview of operations performed by the installation script please check the following installation operations chapter.
Post-installation manual steps & configuration
Once the initial installation is completed, there are a few manual steps necessary in order to finalize the installation, steps which need to be performed with the same installation account. They are described in the following sections:
Requesting a license
- Open a web browser
- Navigate to CYCL’s snowflake license request page (https://www.matchpoint.social/request-snowflake-license)
- In the Snowflake URL field, type the URL of the Newsroom Snowflake
- In the Snowflake Type field, type the following:
Colygon.MatchPoint.Snow.Newsroom.Configurations.NewsroomSnowflakeConfiguration, Colygon.MatchPoint.Snow.Newsroom, Version=2.0.0.0, Culture=neutral, PublicKeyToken=2b039c32f8445f2d - Fill in the other fields as needed
- You will receive an email with the new license
Requesting a license (if the snowflake is already installed)
- Open MatchPoint Configuration Files Administration
- Open a web browser
- Navigate to the <mpadmin>
- Click CTRL + M (or go to “Site Settings” and click on the “Manage Configuration Files” link in the “MatchPoint Administration” section)
- Open the file NewsroomSnowflakeConfiguration.xml
- Go to the License node
- Click the Click here to request license key button
- The field Snowflake URL should be automatically populated. If not, type the url of the Newsroom Snowflake
- The Snowflake Type field should be automatically populated. If not, type
Colygon.MatchPoint.Snow.Newsroom.Configurations.NewsroomSnowflakeConfiguration, Colygon.MatchPoint.Snow.Newsroom, Version=2.0.0.0, Culture=neutral, PublicKeyToken=2b039c32f8445f2d - Fill in the other fields as needed
- You will receive an email with the new license
Enter licenses
- Open MatchPoint Configuration Files Administration
a. Open a web browser
b. Navigate to the <mpadmin>
c. Click CTRL + M (or go to “Site Settings” and click on the “Manage Configuration Files” link in the “MatchPoint Administration” section) - Open the file NewsroomSnowflakeConfiguration.xml
- Enter the licenses according to the target environment. One license has to be updated
- Update the license Newsroom Snowflake license
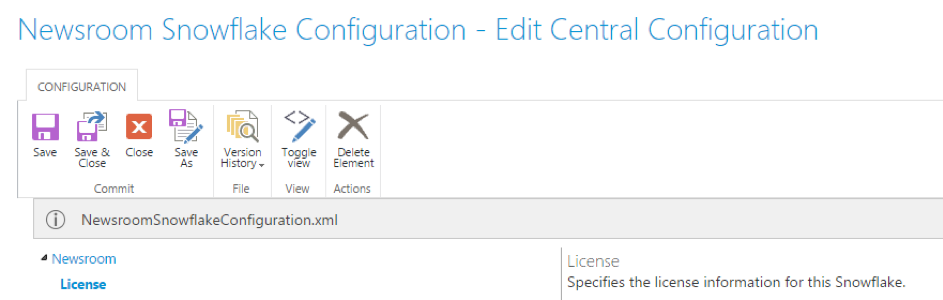 Figure 2 - License information
Reapply Composed looks
Execute the following command in a SharePoint 2016 Management Shell
Reapply-MPSComposedLook -WebApp <MPSnowWebApplication> -Recursive
Run and Verify Timer Jobs
- Run the following Timerjob
- MPSnow.Tags.System.xml
Execute-MPTimerJob -WebApplication <MPSnowWebApplication> -FileName “MPSnow.Tags.System.xml“ -Type “TagImporterConfiguration”
- MPSnow.Tags.System.xml
- Open a web browser
- Navigate to the <mpadmin>
- Click CTRL + M (or go to “Site Settings” and click on the “Manage Configuration Files” link in the “MatchPoint Administration” section)
- Click on the “Timer Jobs” ribbon button
- All timer jobs should run with “Success” as the “Last Run Result” – also have a quick look at the message for the manually run timer jobs
- MPSnow.Tags.System.xml
- MPS.Newsroom.Tags.Channels.xml
Configure permissions in the Newsroom Snowflake
- Open a web browser
- Navigate to the Newsroom Snowflake site collection – <NewsroomSnowflake>
- Go to “Site Settings” -> “Site Permissions” under “Users and Permissions”
- The installation script should have granted Everyone read access on the site collection. Further user permissions can be configured here. Please note that while adding additional permissions for users is supported, removing read access for users will make the Newsroom Snowflake unusable for the corresponding users